Tuesday, September 15, 2015

Sagging or Uneven or 'Wavy' Floors??


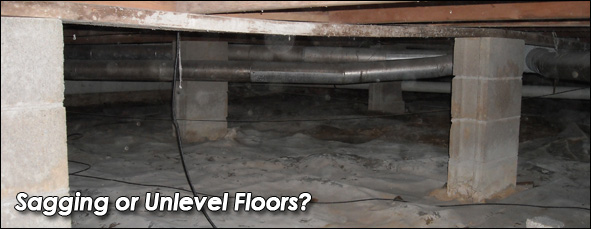
Crawl space foundations are a very popular type of construction throughout the Midwest.  Homeowners of crawlspaces know that they have one common problem – sagging floors. Floors that are sagging or unlevel create many issues for homeowners including cracked tiles, squeaky floors,  and bouncy or wavy floors. These issues require that homeowners seek a solution for supporting these floors to its original position or height. The problem homeowner’s face is that there are many flawed repairs.

Crawlspace Floor Construction

The first thing to consider when looking for floor supports is to understand the cause of the problem. In the construction of a crawlspace foundation, piers are placed below the support beams to give support for the beam and the rest of the floor components.  Floor Joists are placed on top of the sill plate and the beam to support the sub-floor and the home.  The problem is that all of these floor systems can fail causing the uneven floors.  A solution must address the exact problem you are experiencing.  All too often, companies have a one size fits all approach with sagging floor repair, and it very rarely will completely fix the problem.

What causes my sagging, uneven floors?

Problem: Support Piers or Columns Fail

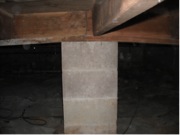
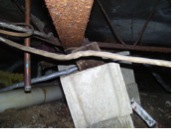
Support piers can be made from concrete blocks, metal post jacks, or wooden posts. These piers rest upon either shallow concrete pads or lightly compacted soils. Over time these piers move with the soil due to fluctuation in soils moisture or soil compaction from the lack of a properdrainage system in the crawlspace. As the pier sinks into the soil, the beam will start to sag causing the uneven and wavy floors.  Also, the beam can be over spanned between the piers causing the beam and floors to be wavy.

Solution: Additional piers with proper footings, and if necessary, a drainage system to prevent the saturation of the soil around the footings.  Sometimes with minor settlement, the problem lies with the shims between the beam and the support column.  A quick repair is to replace these wooden shims with steel. Warning, additional piers is the most common “one size fits all” solution by contractors, but it is NOT the most common cause of sagging floors.  This problem mainly deals with the middle of the home.

Problem: Floor Joist Failure

Floor Joist vary in size and type of material.  The most common floor joist we see in the field are 2×8′s and 2×10′s.  Over time in a vented crawlspace, the joist will weaken due to the high humidity levels in the crawlspace.  Once the joist is softened from moisture, it will sag between the sill plate and the beam.  Another common problem is the over spanning of the floor joist. Load bearing walls may be mistakenly built offset of a joist causing the wall to sag between the joist.  Wood rot and termite damage may cause the joist to deteriorate and sink into the sill plate or beam below it.  As you can see there are many problems that occur with floor joist systems.

Solution:  Each floor joist problem will require different solutions.  Floor joist repair can be very difficult and only experienced professionals should work on your home. Damaged joists must have a new full or sister joist installed next to the old joist.  The over spanned joist cannot be remedied by a new joist.  The joists will require helper beams with support piers placed in the middle of the span to reduce the load the joist is enduring.  The load bearing walls that are offset will need a new floor joist installed directly under the load of the wall.  The joist that is sagging from moisture may require different solutions but ultimately will require adry, encapsulated crawlspace.

Problem: Beam Failure

Center and support beams are constructed of varying materials including wood joists sandwiched together, block lintels, or steel I Beams.  Most of the failure in center beams revolve around the wood beams.  As with joists, moisture problems in the crawlspace can cause them to sag or rot.  When the beams rot or experience termite damage, they will begin to sink down over the piers.  When the beam compresses over the piers, the wall and floor above will sink causing drywall cracks and uneven floors.  The beam will also sag just like the joists if they are spanned too far a distance between piers.

Solution:  A damaged center beam or girder from rot or termite damage will have to be completely replace with a new beam. Center Beam Repair is a very tedious and difficult process, and should not be installed by anyone other than experienced professionals.  As for over spanning and minor sagging problems, the beams will require a new pier in between the load to lift the sag out of the beam.

Problem: Sill Plate Failure

A crawlspace sill plate is usually composed of 2×4, 2×6, or 2×8 lumber and is anchored to the foundation wall, often with J-bolts.  The sill plate SHOULD be at least 6 inches above the finished grade and be composed of treated lumber.  In older homes, the sill plates were not treated and were too close to the finished grade.  The main problems of sill plate failure are from wood rot and termite damage. Once the sill plate is weakened, the floor joist will begin to compress into the plate.  As a result, you will see baseboards separating from the floor, windows and doors that stick or will not open, and dry wall cracks.

Solution: Sill Plate Repair is difficult because the home has to be lifted sometimes up to two inches to install a new plate.  Many contractors will put in a new plate and just notch the joist leaving the home where it has dropped.  This method is common and unethical.  The only repair for sill plate damage should be to bring the home to its original position and install the exact same size sill plate.

Friday, September 11, 2015

5 Big Homebuyer Mistakes of their Home Inspection


A home inspection is one of the most important steps you can take to make sure your new home is a sound investment and a safe place to live.

But, many people don't fully understand what happens in a home inspection or what they need to do to get the most out of it. Find out what inspectors say are the five biggest mistakes buyers make during the home inspection, and how you can avoid these potentially pricey pitfalls.
 

Mistake No. 1: Not having new construction inspected
 

Even experienced homebuyers sometimes make this rookie mistake. They assume that because a home has passed all local codes and ordinances, it must be in good shape. Don't be so sure, says Jim Troth, owner of Habitation Investigation LLC, a Mechanicsburg, Ohio, home inspection company. Troth once inspected a brand new home that had just passed the final municipal and county building inspections. But when he explored the crawl space beneath the house, he discovered someone had removed about 3 feet of the home's main support beam to accommodate duct work.

"The house was already beginning to sink in that area," he says.

The moral of the story: Don't assume your builder -- or the contractors -- did everything right just because the home passed code. An inspector is your last line of defense against major defects that could quite literally sink your financial future.
 

Mistake No. 2: Choosing an inspector for the wrong reasons
 

When you choose an inspector, you're selecting the professional who will give one of your biggest investments a full physical checkup. You want to choose someone you know who is competent, thorough and trustworthy. Unfortunately, too many buyers just go with the cheapest inspection company.

"The least expensive person is often the person with the least experience, ability and technical savvy," says Aaron Flook, owner of Pittsburgh-based A.M. Inspection Services LLC.

Always ask about licensing, professional affiliations and credentials, and whether the inspector carries errors and omissions insurance.
 

Mistake No. 3: Not going along on the inspection
 

The report you get from the inspector doesn't give you nearly as clear a picture of the condition of the house as you might think.  Flook says buyers who don't go along on the inspection can overemphasize minor problems, or worse, not realize how serious a defect is.

"I did one inspection where the buyer didn't come along, and he ended up getting worked up about first-floor plugs that weren't grounded and completely ignored that the hot water tank was drafting carbon monoxide," Flook says. "You really need to go along with the inspector, ask questions and listen when he gives you his professional opinion on the house."
 

Mistake No. 4: Not following up on the inspector's recommendations
 

Sometimes, buyers don't follow up on items discovered in the inspection before they close. Like the man who didn't grasp that the carbon monoxide coming from his water heater was a big problem, you may not realize how much it will cost to fix a given defect. Often inspectors will recommend buyers get an issue evaluated further, but the buyers wait to do it until after closing, says Kathleen Kuhn, president of the inspection company HouseMaster of Bound Brook, N.J.

"If buyers wait to have a system evaluated until after closing, it can turn out to be more expensive or a bigger deal than what they anticipated," Kuhn says.  Kuhn says you should always get several estimates on repairs before closing.
 

Mistake No. 5: Expecting your home inspector to be a psychic
 

No matter how experienced or skilled your home inspector is, he can't see the future. "Home inspectors don't have crystal balls, so they can't specifically predict when an aging system will fail," Kuhn says. "Sometimes, optimistic homebuyers think a system still has a few good years just because there aren't visible signs of malfunction at the time of inspection."

A home inspector can tell you that an air conditioning system like the one in the home you're buying usually only lasts 10 years, and yours is 11 years old. But he can't tell you when it will fail. That's when you need to follow up with people who know more about each specific system about which you have questions.

And remember, the home inspector is hired by you. He's there to give you an honest, straight opinion about the house.

"The inspector is one of the few people in the buying process whose income doesn't depend on the home closing," Troth says. "They're paid to inspect, not to sell. So they're in a better position to be neutral.
 

Article credit - bankrate.com

Tuesday, September 8, 2015

Inground Pool Cost of Ownership: Fiberglass vs Concrete vs Vinyl

If you are considering purchasing an inground pool, you’re probably wondering what maintenance costs you can expect to encounter as the years pass on.  As you’ll see, the answer to that question largely depends on the type of pool you choose:  concrete, vinyl, or fiberglass.

Cost of Owning a Concrete Pool

Concrete Pools have the highest cost of ownership.  This is due to several factors.  First, because the surface of a concrete pool is extremely porous, it harbors algae and this means two things to concrete pool owners:  more chemical usage and running the pump and filter for longer periods of time.  Of course, consuming both more chemicals and electricity equals more money spent.  Also, because concrete pools require more maintenance, many concrete pool owners chose to have a pool company service their pool on a weekly or bi-weekly basis.

Secondly, concrete pools require acid washing every three to six years at a cost of around $500 a pop depending on the location.  This is another consequence of algae embedding into the pool surface.  Acid washing is a treatment that requires draining the pool and cleaning the surface with a mild acid solution to kill spores and therefore prevent what’s known as an algae bloom.

Finally, most concrete pools require resurfacing and re-tiling about every 10-15 years at a cost of $10,000 or more. 

Cost of Owning a Vinyl Liner Pool

Vinyl Liner Pools are unlike concrete pools in that they do not require the time or money investment to battle algae.  However, despite their low initial cost, vinyl pool owners should be prepared to fork out $4,000 or more every five to twelve years when it’s time to replace the liner.

What about the 20 year liner warranty you ask?  Read the fine print my friend.  It only covers where the liner is seamed together and then on an extremely pro-rated schedule…and then the warranty does not cover labor to replace the liner or the cost of water to re-fill the pool. 

Cost of Owning a Fiberglass Pool    

Fiberglass Pools have the lowest cost of ownership of any inground pool for several reasons.  First, fiberglass pools require less chemicals and filter run time because the surface of the pool is non-porous therefore inhibiting the growth of algae.  This equates to about 70% less chemical usage than concrete pools.  Furthermore, because fiberglass pools are so easy to maintain, fiberglass pool owners typically opt to maintain their own pool instead of hiring a pool service company. 

Second, the majority of fiberglass pools that are properly built and maintained require no significant maintenance to the pool shell for at least the first 20 or 30 years.  With no liner to replace or need to acid wash, this leaves the pool owner with only the year to year costs of electricity and chemicals. 

Without question, each type of inground pool has its advantages.  But when it comes to lifetime cost of ownership, fiberglass pools take the cake….hands down!

Monday, September 7, 2015

5 Great Made-in-America Home Improvement Ideas


5 Great Made-in-America Home Improvement Ideas

By
Chrystal Caruthers

1:00 pm ET
September 4, 2015

Simpson Door Co.

The made-in-America movement is going strong these days: We’re producing more of our own energy, more of our own cars, and more of our own manufacturing jobs. In fact, even foreign automotive brands have adopted the “Made in America” credo. So as we head into Labor Day weekend, let’s take a moment to appreciate great pieces for your home that were proudly made in the U.S. of A! And let’s do it state by glorious state!

Made in Florida: When wire hangers and a single hanging rod won’t do, ClosetMaid offers SuiteSymphony, a step up from the standard closet but not quite the stuff of this two-story Chanel-inspired closet. ClosetMaid, the inventor of wire closet shelving, offers a new weathered wood-look product that is manufactured in Florida. “Sixty-one percent of all recent home buyers will upgrade their closet systems within 18 months,” says Lisa Engel, vice president of consumer business at ClosetMaid. With a $2,000 investment, she says, homeowners can create their own version of a glam room.

SuiteSymphony line

ClosetMaid

———

Made in Pennsylvania: Want the look of stone without having to endure cold feet? That’s the promise of Alterna Luxury Vinyl by Armstrong. Bonus: This composite flooring uses stone mined in Illinois then assembled in Pennsylvania—making it doubly American! The Allegheny Slateflooring shown below costs about $600 to $700 for about 100 square feet.

Alterna Luxury Vinyl flooring in Allegheny Slate

Armstrong

———

Made in Ohio: OK, let’s just put it out there: There’s nothing sexy about shopping for a new toilet. Yet, when it’s time to replace your water-guzzling throne, why not seek an eco-friendly one made in none other than the Buckeye State? Mansfield Plumbing is based inPerrysville and produces an extensive line of well-priced water-saving toilets.

Brentwood bathroom collection

Mansfield Plumbing

———

Made in Washington: Fun fact: Nothing can up your curb appeal and recoup your reno budget as quickly as replacing your front door. Simpson Door Co. has been crafting solid-wood doors from Douglas fir, Nootka cypress, and other woods native to the Pacific Northwest since 1912. Most of its most popular exterior doors are made inMcCleary and now include water protection as a standard feature rather than an upgrade. Even if you don’t decide to buy—a door like this one can set you back about $1,800—play around with their design-a-door tools to get some inspiration.

Solano® III Exterior Door in Douglas fir

Simpson Door Co.

———

Made in Kentucky: Wait, so this new GE fridge will brew my morning coffee? Sign me up! This latest in creature comforts just might be the most satisfying, especially ifPhilz Coffee develops a K-Cup. This new french door Cafe Series refrigerator has an in-door hot water dispenser fitted with a Keurig brewing system. Genius! You’ll need to wait until fall for this upgrade, and it will set you back about $3,300—but it’s coffee dispensed like water from your fridge. Now that’s American.


#homeinspection #homeimprovement

#prochek #ctinspection #nyinspection

#homebuyer #engineeringinspection

#realestate #prochekhomeinspectionsservicesisakeyparttoahomebuyersteam


How to tell if you may need a new roof

How to tell if you may need a new roof

One of the questions that any home owner should be asking themselves if they have a roof that is getting up there in age is “how do I know if I need a new roof”? Your roof is one of the most important parts of your home, for obvious reasons. Without it you would be left with four walls and a foundation – not enough to provide much comfort or protection from the elements. Like everything though, a roof will wear out over time.

As a homeowner you need to be aware of the state of yours and whether it needs repairs or replacement, especially if you have any plans on selling the home.  Knowing whether you need a new roof prior to selling becomes important so you have a sound strategy in place.

Working as a Massachusetts Realtor for the past twenty seven years, one of the things that becomes a bone of contention more than any other when negotiating home inspection issues is a worn roof. Of course from a home owners perspective if there is any amount of years left on the roof they want to do nothing. The buyer of course when told there is very little roof life wants to negotiate for a new one.

While the quickest way to find out the state of your roof would be to call a roofing contractor for an inspection prior to putting your home on the market, you do not necessarily need to pay someone else to do periodic checkups.

You can look for signs of damage yourself. According to the National Roofing Contractors Association, homeowners should examine their roofs in both the spring and the fall. Mark a time on your calendar for spring and fall and perform the following checks as necessary. Read on and you will discover the best ways of how to tell if you need a new roof or not.

Interior Roof Check

One of the first ways how to tell if you need a new roof is to get into the attic. The interior check is fairly easy to do as long as you have access to the attic and a good flashlight. Invest in a good light because you want to be able to see fine details. Even the best flashlight is far cheaper than replacing your roof, so get something that will give you all the light you need to search the attic.

Once you get up there, look around for four particular signs of roof troubles:

Light shining in from outside – This is the easiest problem to discover, even without a flashlight. Any light shining in through your roof from outside is a problem that should be addressed immediately. If light is getting through, so is moisture.Sagging Areas – If there is a sag in your roof this will be one of the easier ways to tell if you need a new roof. Sagging is a definite indication of structural issues. Something has given way, either due to external pressure from outside or from moisture damage to the wood that makes up your roof.Dark Spots or Trails – Dark areas and trails are an indication that moisture is penetrating your roof somewhere and probably creating mold in the process. Moisture will eventually cause real problems, both with your roof and with the interior of your home.Leaks or Water Damage – If you actually see a leak or obvious water damage it is time to call in a roofing repair company. Water causes damage and it is important to patch any leaks as soon as possible.

The are all sure fire ways to tell if you need a new roof or not.

Exterior Roof Check

Another way of checking to see if you need a new roof is to actually take a trip up onto your roof. Getting onto the roof should be able can give you a good idea of the state of the exterior. Keep in mind that even an eight-foot drop can cause serious injuries, so make sure your ladder is secure and that you are very, very careful while looking around. Also, avoid walking on your roof if it is made out of easily damaged materials such as tile.

Look for Damage – Major damage to roofing materials should be fairly obvious. Shingles will split, crack and warp if they get too old, while tile will break if it has been damaged by hail. If your roof is older and there is visible damage it is far easier to tell if you need a new roof.Look for Moisture Problems – Mold and other moisture related problems could wreak just as much damage outside as in. A bad shingle can allow moisture to sit instead of shedding it down the roof. Keep in mind that water will flow down, so you may have to track the problem higher up.Shingle Granules – As your shingles age they will shed more and more granules. If they are getting too old you will likely find excessive amounts of granules in your gutters. This is a sure fire way to tell if you need a new roof sooner rather than later.Look for Wear – Roofing materials around chimneys and vents can wear over time, so keep an eye out for any issues here.Check Your Drainage – Your gutters and downspouts are an important component of your home and should be cleaned a few times a year. Check to make sure they are securely attached and that water is flowing where it should be.

Each of these problems are signs that it may be time to think about getting a roof replacement.

What If You Find Roof Problems?

407Just because you find signs of wear does not mean your roof necessarily needs to be replaced. It may just need some repairs done to extend its life. A quality shingle roof should last at least 20 to 30 years, especially with regular maintenance by knowledgeable professionals. If your roof is tile it should be good for quite a bit longer, even up to 100 years before replacement.

Typically an asphalt shingle roof that is architectural grade with last at least 30 years. An architectural shingle looks different than a standard asphalt shingle which looks completely flat when looking from the ground. An architectural shingle has “depth” and most would agree looks much better. These shingles are more expensive and rightly so given how much better they look and the extended roof life they deliver.

Once you notice an issue, contact a roofing contractor to get an estimate on getting the repair work done. It is usually best to get a few estimates to get an idea of what the cost will be and to feel out several contractors before you commit to one. Get references from them and contact those references before you give the go ahead on the roofing repairs.

If it has been some time since you have examined your roof, or your roof is old enough where replacement is the only option, it is best to bite the bullet and get the work done. There is no denying that having a whole new roof put on is expensive, but it is an investment in your home.

It makes the home livable, prevents any further damage from the elements to other parts of the home and makes the property more appealing should you choose to sell it. A new roof is considered by home appraisers in the appraisal process and will appeal to any potential buyer who views your home.

If you are going to sell your home however, you may not necessarily want to go out and purchase a new roof. You may be thinking why and the answer is simple. A roof does not have a very good rate of return when selling a home. A buyer is going to expect to purchase a home that has a decent roof but it has been shown over and over again they will not pay extra just because your roof is new. All things being equal a buyer will pay for more tangible things such as an updated kitchen or bath they can use and enjoy daily.

So for example if a new roof on your home is going to cost $10,000 you are more than likely going to be out of luck if you think that adjusting your sale price upwards by $10,000 is going to be acceptable. More than likely you will not get anywhere near a 100 percent return on a roof and in fact far from it.

This is where your Realtor comes in to give you guidance. More than likely unless your roof is in dire need of replacement the advice will be a wait and see approach. The buyer will more than likely do a home inspection in which the roof will be flagged. This will be the point at which you can negotiate a home inspection settlement with the buyer that in many cases will end up being less than a full replacement. Hopefully you were smart enough to hire a Realtor who has some negotiation skills as this is one of the points in a real estate transaction where they are needed most.

More Roofing Resources

What are the most popular types of roofing shingles – see some of the more popular types of roofing shingles. Including comparisons between 3 tab and architectural shingles.How to calculate a roofing bid – see how much a roof should cost to replace.What can you expect to pay for a new roof by Angies List. See the average cost to replace a roof.

If you discover you need a new roof use these roofing resources to help guide your decision making process on what type of shingles you should choose along with expected costs for your roof replacement.

__________________________________________________________________________________________________________________

The above Real Estate information on how to tell if you need a new roof was provided by Bill Gassett, a Nationally recognized leader in his field. 

http://www.maxrealestateexposure.com/tell-need-new-roof/?utm_content=buffer3704d&utm_medium=social&utm_source=twitter.com&utm_campaign=buffer

Thursday, September 3, 2015

How to Maintain your Septic System

How to Maintain Your Septic System

YOUR SEPTIC SYSTEM IS YOUR RESPONSIBILITY

If properly designed, constructed and maintained, your septic system can provide long-term, effective treatment of household wastewater. If your septic system isn’t maintained, you might need to replace it, costing you thousands of dollars.  A malfunctioning system can contaminate groundwater that might be a source of drinking water. And if you sell your home, your septic system must be in good working order.

This guide will help you care for your septic system. It will help you understand how your system works and what steps you can take as a homeowner to ensure your system will work properly. To help you learn more, consult the resources listed at the back of this booklet.

Top Four Things You Can Do to Protect Your Septic System

Regularly inspect your system and pump your tank as necessary.Use water efficiently.Don’t dispose of household hazardous wastes in sinks or toilets.Care for your drainfield.How does a septic system work?

Components

A typical septic system has four main components: a pipe from the home, a septic tank, a drainfield and the soil. Microbes in the soil digest or remove most contaminants from wastewater before it eventually reaches groundwater.

Pipe from the home

All of your household wastewater exits your home through a pipe to the septic tank.

Septic tank

The septic tank is a buried, watertight container typically made of concrete, fiberglass, or polyethylene. It holds the wastewater long enough to allow solids to settle out (forming sludge) and oil and grease to float to the surface (as scum). It also allows partial decomposition of the solid materials. Compartments and a T-shaped outlet in the septic tank prevent the sludge and scum from leaving the tank and traveling into the drainfield area. Screens are also recommended to keep solids from entering the drainfield.

Newer tanks generally have risers with lids at the ground surface to allow easy location, inspection, and pumping of the tank.

Septic system aliases:

On-lot systemOnsite systemIndividual sewage disposal systemOnsite sewage disposal systemOnsite wastewater treatment systemTip

To prevent buildup, sludge and floating scum need to be removed through periodic pumping of the septic tank. Regular inspections and pumping are the best and cheapest way to keep your septic system in good working order.

Finding Your System

Your septic tank, drainfield, and reserve drainfield should be clearly designated on the “as-built” drawing for your home. (An “as-built” drawing is a line drawing that accurately portrays the buildings on your property and is usually filed in your local land records.) You might also see lids or manhole covers for your septic tank. Older tanks are often hard to find because there are no visible parts. An inspector/pumper can help you locate your septic system if your septic tank has no risers.

Drainfield

The wastewater exits the septic tank and is discharged into the drainfield for further treatment by the soil. The partially treated wastewater is pushed along into the drainfield for further treatment every time new wastewater enters the tank.

If the drainfield is overloaded with too much liquid, it will flood, causing sewage to flow to the ground surface or create backups in plumbing fixtures and prevent treatment of all wastewater.

A reserve drainfield, required by many states, is an area on your property suitable for a new drainfield system if your current drainfield fails. Treat this area with the same care as your septic system.

Soil

Septic tank wastewater flows to the drainfield, where it percolates into the soil, which provides final treatment by removing harmful bacteria, viruses, and nutrients. Suitable soil is necessary for successful wastewater treatment.

Alternative systems

Because many areas don’t have soils suitable for typical septic systems, you might have or need an alternative system. You might also have or need an alternative system if there are too many typical septic systems in one area or the systems are too close to groundwater or surface waters. Alternative septic systems use new technology to improve treatment processes and might need special care and maintenance. Some alternative systems use sand, peat, or plastic media instead of soil to promote wastewater treatment. Other systems might use wetlands, lagoons, aerators, or disinfection devices. Float switches, pumps, and other electrical or mechanical components are often used in alternative systems. Alternative systems should be inspected annually. Check with your local health department or installer for more information on operation and maintenance needs if you have or need an alternative system.

Why should I maintain my septic system?

When septic systems are properly designed, constructed, and maintained, they effectively reduce or eliminate most human health or environmental threats posed by pollutants in household wastewater. However, they require regular maintenance or they can fail. Septic systems need to be monitored to ensure that they work properly throughout their service lives.

Saving money

A key reason to maintain your septic system is to save money! Failing septic systems are expensive to repair or replace, and poor maintenance is often the culprit. Having your septic system inspected regularly is a bargain when you consider the cost of replacing the entire system. Your system will need pumping depending on how many people live in the house and the size of the system. An unusable septic system or one in disrepair will lower your property value and could pose a legal liability.

Protecting health and the environment

Other good reasons for safe treatment of sewage include preventing the spread of infection and disease and protecting water resources. Typical pollutants in household wastewater are nitrogen, phosphorus, and disease-causing bacteria and viruses. If a septic system is working properly, it will effectively remove most of these pollutants.

With one-fourth of U.S. homes using septic systems, more than 4 billion gallons of wastewater per day is dispersed below the ground’s surface. Inadequately treated sewage from septic systems can be a cause of groundwater contamination. It poses a significant threat to drinking water and human health because it can contaminate drinking water wells and cause diseases and infections in people and animals. Improperly treated sewage that contaminates nearby surface waters also increases the chance of swimmers contracting a variety of infectious diseases. These range from eye and ear infections to acute gastrointestinal illness and diseases like hepatitis.

How do I maintain my septic system?

Inspect and pump frequently

You should have a typical septic system inspected at least every 3 years by a professional and your tank pumped as recommended by the inspector (generally every 3 to 5 years). Alternative systems with electrical float switches, pumps, or mechanical components need to be inspected more often, generally once a year. Your service provider should inspect for leaks and look at the scum and sludge layers in your septic tank. If the bottom of the scum layer is within 6 inches of the bottom of the outlet tee or the top of the sludge layer is within 12 inches of the outlet tee, your tank needs to be pumped. Remember to note the sludge and scum levels determined by your service provider in your operation and maintenance records. This information will help you decide how often pumping is necessary.

Four major factors influence the frequency of pumping: the number of people in your household, the amount of wastewater generated (based on the number of people in the household and the amount of water used), the volume of solids in the wastewater (for example, using a garbage disposal increases the amount of solids), and septic tank size.

Some makers of septic tank additives claim that their products break down the sludge in septic tanks so the tanks never need to be pumped. Not everyone agrees on the effectiveness of additives. In fact, septic tanks already contain the microbes they need for effective treatment. Periodic pumping is a much better way to ensure that septic systems work properly and provide many years of service. Regardless, every septic tank requires periodic pumping.

In the service report, the pumper should note any repairs completed and whether the tank is in good condition. If the pumper recommends additional repairs he or she can’t perform, hire someone to make the repairs as soon as possible.

Use water efficiently

Average indoor water use in the typical single-family home is almost 70 gallons per person per day. Leaky toilets can waste as much as 200 gallons each day. The more water a household conserves, the less water enters the septic system. Efficient water use can improve the operation of the septic system and reduce the risk of failure.

Install high-efficiency showerheadsFill the bathtub with only as much water as you needTurn off faucets while shaving or brushing your teethRun the dishwasher and clothes washer only when they’re fullUse toilets to flush sanitary waste only (not kitty litter, diapers, or other trash)Make sure all faucets are completely turned off when not in useMaintain your plumbing to eliminate leaksInstall aerators in the faucets in your kitchen and bathroomReplace old dishwashers, toilets, and clothes washers with new, high-efficiency modelsFor more information on water conservation, visit http://www.epa.gov/watersense/index.html

High-efficiency toilets

Toilet use accounts for 25 to 30 percent of household water use. Do you know how many gallons of water your toilet uses to empty the bowl? Most older homes have toilets with 3.5- to 5-gallon reservoirs, while newer high-efficiency toilets use 1.6 gallons of water or less per flush. If you have problems with your septic system being flooded with household water, consider reducing the volume of water in the toilet tank if you don’t have a high-efficiency model or replacing your existing toilets with high-efficiency models.

Faucet aerators and high-efficiency showerheads

Faucet aerators help reduce water use and the volume of water entering your septic system. High-efficiency showerheads or shower flow restrictors also reduce water use.

Water fixtures

Check to make sure your toilet’s reservoir isn’t leaking into the bowl. Add five drops of liquid food coloring to t

Wednesday, September 2, 2015

The Limitations of a Home Inspection

The Limitations of a Home Inspection

by Nick Gromicko and Kenton Shepard


The Home Inspection Defined


A general home inspection is a visual inspection for system and major accessible component defects and safety issues. The inspection is not technically exhaustive. A "general home inspection" and a "home inspection" are the same thing.


A home inspection is designed to reflect, as accurately as possible, the visible condition of the home at the time of the inspection. Conditions at a home for sale can change radically in only a day or two, so a home inspection is not meant to guarantee what condition a home will be in when the transaction closes. It’s not uncommon for conditions to change between the time of the inspection and the closing date.


Above:  an overloaded outlet with no cover

It’s a Visual Inspection

A “visual” inspection means that a home inspection report is limited to describing conditions in those parts of a home that an inspector can see during the inspection. Obviously, parts of the home that are permanently hidden by wall, ceiling and floor coverings are excluded, but so are parts of the home that were inaccessible during the inspection for some other reason. Some reasons might include lack of an access point, such as a door or hatch, or a locked access point, or because an occupant’s belongings blocked access, or because of dangerous or unsanitary conditions.

There can be many more reasons. The point is that if an inspector can’t see a portion of the home, the inspector can’t assume responsibility for ensuring that a safe and proper condition exists or that systems are operating properly in that hidden space.

Safety

Safety can be a matter of perception. Some conditions, such as exposed electrical wiring, are obviously unsafe. Other conditions, such as the presence of mold, aren’t as clear-cut.

In the example of the possible existence of mold, it's difficult to accurately call it out during a general home inspection because mold sometimes grows in places where it can’t be readily seen, such as inside walls, making its discovery beyond the scope of the inspection.  Also, the dangers to human health are from the inhalation of spores from indoor air.

Most people with healthy immune systems have little or no problem with inhaling spores. A few people whose immune systems are compromised by lung disease, asthma or allergies can develop serious or even fatal fungal infections from mold spore levels that wouldn’t affect most people. Every home has mold and mold colonies can grow very quickly, given the right conditions. Mold can be a safety concern, but it often isn’t. The dangers represented by mold are a controversial subject. Other potential safety issues also fall into this category.


Above:  the cutting torch and gutter system of roof drainage management


System Defects


Although the majority of the inspection is visual, the InterNACHI Standards of Practice do require inspectors to operate space and water heating equipment, and air-conditioning equipment, if it can be done without damaging the equipment.


Inspectors will also examine the major accessible components of certain systems as required by the Standards of Practice. Furnace air filters are one example.

A home inspection is not technically exhaustive, meaning that systems or components will not be disassembled as part of the inspection. For example, an inspector will not partially disassemble a furnace to more accurately check the condition of the heat exchanger. Inspectors typically disclaim heat exchangers.

Hazardous Materials

Asbestos, mold, lead, water purity, and other environmental issues or potential hazards typically require a specialist inspection, and may additionally require laboratory analysis.

Home Inspectors are Generalists

Home inspectors are not experts in every home system but are generalists trained to recognize evidence of potential problems in the different home systems and their major components. Inspectors need to know when a problem is serious enough to recommend a specialist inspection. Recommendations are often made for a qualified contractor, such as a plumber or electrician, and sometimes for a structural engineer.


Above:  the result of subfloor movement

Inspector Qualifications

Very few home inspectors have been in the inspection industry for their entire working lives. According to an InterNACHI poll, about half the home inspectors have a background in the building trades. Those with a construction background started with a general idea of the systems and components that they might find installed, as well as how those systems age and fail.

This doesn’t mean that inspectors with a background in something other than the building trades are not qualified -- only that they started in the inspection industry at a relative disadvantage. Building the skills and developing the judgment to consistently recognize and interpret evidence correctly and make appropriate recommendations are things that can be improved with practice and continuing education.


Above:  improper electrical splice


Managing Expectations

Part of a home inspector’s job is to manage the expectations of their client. This is especially true when a client has never dealt with a home inspector before. Explaining the limitations of a home inspection to a client will help them develop realistic expectations concerning what to expect from a home inspection report, and what lies beyond the scope of the inspection.

When a home buyer is interviewing inspectors, the buyer should ask about how the inspector handles special safety concerns.

Disclaimers are portions of an inspection agreement or report in which an inspector notifies the client that the inspector will not accept the responsibility for confirming the condition of a portion of the home or of a particular system or component.

Creating realistic expectations in a client’s mind will help prevent misunderstandings and promote smooth real estate transactions.

http://www.nachi.org/limitations-home-inspection.htm